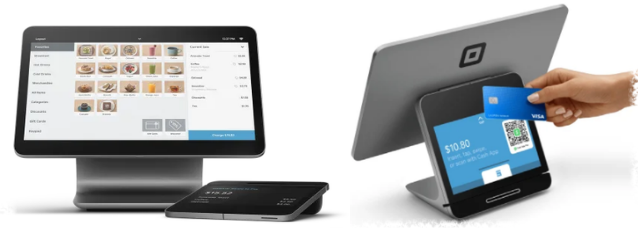
Everything you can accomplish with your new Square Register will be demonstrated in this fast and step-by-step guide.
First, you should think about the people who will be watching your customer display. It connects quickly to the Square Register. Simply press down hard on the bottom corners of the client display to make absolutely sure that it is securely fastened in position. Furthermore, it is activated immediately when the Square Register is turned on.
If you want to relocate the customer display closer to your clients, you may undock it by holding down the release button on the bottom of the Register and lifting the device out. Make use of the customer display cable that has been provided. Connect one end of the cable to the bottom of the client display and then the other end of the cable to the Register. A basic disconnect and replug will either bring your client display back in operation.
Log into your Square Dashboard on your PC to make changes to the images that appears on your client display. Our video on Setting Up Locations will walk you through the process step-by-step. Also take into account that you can always use the provided accessory hub to connect a cash drawer, bar code scanner, and printer to the Register.

Setup and menu for the square register
You’ll want to be certain that your device is connected to the web and that you are signed into your Square Register account before we go through all of the many ways Square Register can help you grow your business. Simply check for the Wi-Fi sign or the Ethernet arrows on the network.
Your point-of-sale application can be found below Checkout. And that’s where you may ring up things from your item library, input in custom values, provide discounts, and check the balances of your clients’ gift cards, among other functions.
Hold your finger on a tile until you enter in Edit Mode if you need to make changes to your product grid on the fly. Then you may add new things or rearrange your existing items anyway you wish. In your item library, you may generate or change products, categories, discounts, and gift cards, among other things. Increase or decrease the price of the item, add price points for various sizes, and apply sales tax on the product.

New customers
Adding new or existing clients to a transaction may be done at the point of sale, and you can control your customer list by selecting Customers from the main menu.
It’s simple to browse for all of your clients by name, phone number, or email address. It is possible to fix duplicate customers and add new clients directly from the list of clients. In order to add a customer to the database, simply select “Create Customer”, type their details on the display, and optionally save a credit card on file. It is recommended that you import long lists of clients into your Square Dashboard.
Aside from that, you may view useful data about your clients, such as who your regular customers are and who hasn’t been in quite some time. Try using Square Marketing to deliver them offers in order to lure potential consumers into your store and raise your sales volume.

History of payments
In the transactions section, you may search for all of your activities by receipt number or credit card details. This way, it is simple to create a fresh receipt for your client or offer a refund to them. Simply locate the sale and utilize the large buttons at the top of the screen.

Invoices and Sales report
Additionally, Square makes it simple to create and send invoices directly from your register. When you use Square Register, your client will receive an email in which they will be able to pay their invoice with a couple of clicks.
Square Register simplifies the process of checking daily sales data. It’s as simple as selecting the timeframe for which you would like to examine your transactions. Then, with a simple tap, you can view the deposits that Square has sent to your account.
You may access your Square Dashboard using your computer and get more extensive information. It’s your way of staying on top of everything that’s going on in your workplace.

Settings
You may also make rapid changes to your device’s and company’s settings. The Wi-Fi connection, display light levels, and staff timecard options are all configured in this section of the panel. As a pro suggestion, enable this feature so that employees may clock in and out directly on the register.
A fast answer to any difficulties that may occur can be found under the Support tab.
![]()

☷ What Can You Do With a Square Terminal? ➚
☷ What Machine Do You Need? Take a look➚
☷ Fast Shipping of Terminals to New Jersey ➚
